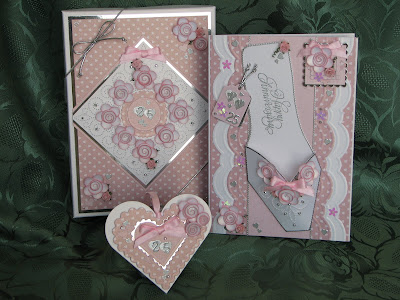
This has been another intense week of crafting but for special happy occassions. The first project is for the silver wedding anniversary of my crafting friend Janet and her husband Nick who are celebrating their silver wedding anniversary on the 28th. At least once a month a group of us meet together at Janet's and craft, chat and indulge in her home baking. Her chocolate cake is absolutely scrummy.
I have made this card layout several times in the past, for anniversaries and weddings and in various colour combinations, but never tire of putting together this "elegant shoe" from a template designed by Coppernob. Pictures of some of them are in the Toe Tapper section of Coppernob's gallery. Although time consuming to make, the end result is really effective. The flower embellishments are made using a quilling pattern I found in a Craft Creations project for a rose basket. I use a one inch and a half inch punch to make them.
As time has gone on this project has expanded from a card in a box, to a card in a decorated box and finally to a card in a decorated box with a gift tag. Lots of different techniques are used to make this one including one of the first ones I used when starting to make cards - paper pricking.
The base card is A5 in size
The sizes for the layering panels are
Layer one - 14.5cm x 21cm
Layer two, before embossing and trimming, 15cm x 21cm
Layer three, before embossing and trimming, 12cm x 21cm
Centre panel - 6.5cm x 21cm
Papers used
White pearlescent card
Pink heart paper is from a Cuddly Buddly download - Cuddly Buddly Cottage Collection - Rose, printed on pearlescent card
Pink paper is a canvas background paper from the Secret Garden CD by Joanna Sheen, printed on pearlescent card
Silver mirri-card from Create and Craft
Tools used
Romance embossing board from the Glitter Girls
Elegant Shoe Template by Coppernob
Ornare Pricking Template
Pricking pen and mat
Woodware 1 inch circle punch
Woodware 1/2 inch circle punch
Woodware small heart punch
Quilling tool
Spellbinders Nestabilities Classic Squares Large
Spellbinders Nestabilities Classic Scalloped Squares Large
Spellbinders Nestabilities Classic Circles Large
Spellbinders Nestabilities Classic Scalloped Circles Large
Spellbinders Nestabilities Classic Hearts
Spellbinders Nestabilities Classic Scalloped Hearts
Quickutz Single Die - RS0156 - Scalloped Tag
PSX Stamp - F-270 - Happy Anniversary
Versamark Ink
Stampendous Detail Silver embossing powder
VersaMagic Dew Drop Chalk Ink - Pink Petunia
Embellishments used
Silver wavy line peel-offs
Silver hearts peel-offs
Silver double hearts peel-offs
Silver alphabet and number peel-offs
Bling Bling self adhesive crystals
Flower sequins, silver metallic embroidery thread and white pearl beads
Pink Paper Roses
Pink Satin Ribbon
Silver Elastic Cord
Top tips for this card would be
1. Sponge the petal edges and flower centres with an ink colour to match the backing papers of the project. Pearlescent ink gives a lovely shimmery effect and if you go over it with a clear Sakura glitter gel pen afterwards it sparkles even more.
2. When embossing layers from the Romance board butt one side of each layer to the top of the board and when embossing the other side butt it to the bottom of the board. For some strange reason the panels layer on top of each other better if you do this.
3. I cut another sole for the shoe slightly smaller than than the decorated one and attach underneath with the really sticky double sided tape. This gives the shoe more body and holds the wrapped over peel-off ends in place. I also use the really sticky red tape to attach the shoe to the card.
Thanks for reading
Liz x


No comments:
Post a Comment